65-66 Non-Power Brakes MC Gasket Cap
 04-09-2011, 02:52 AM
#1


I may have asked this question 5 years ago when I installed a new MC, but the search engine is not working tonight, so I appologize in advance.
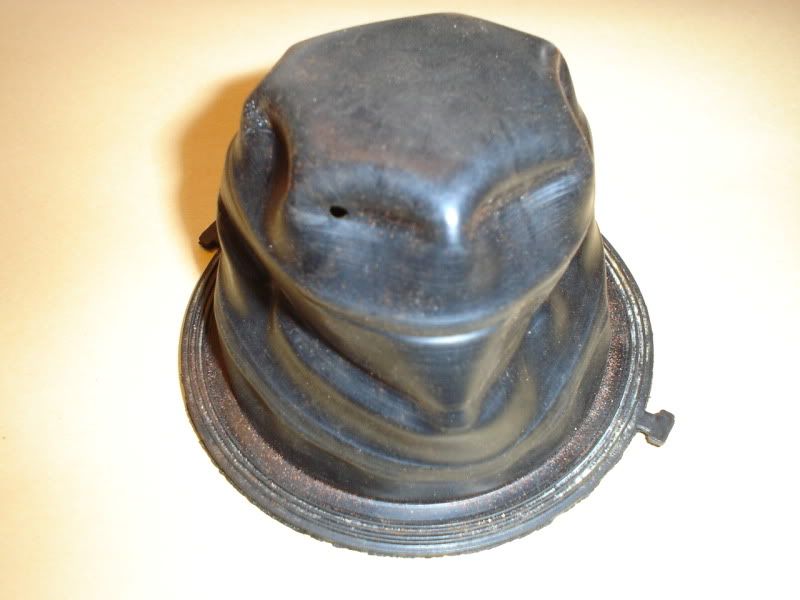
1. Do I install this master cylinder cap rubber gasket as shown in the photo? Every new one I've installed facing down seems to leak a bit (even with the clamps nice and tight), including on my 1965 Mustang which has a similar Bendix MC and uses the same gasket. When installed as shown in the photo, they never leak. Just by looking at the design of the metal cap, it would seem that the photo reflects the correct orientation.

Also does the metal cap's vent hole normally face the front or back of the car (or it did not matter during assembly back in 1965)?
Thanks
1. Do I install this master cylinder cap rubber gasket as shown in the photo? Every new one I've installed facing down seems to leak a bit (even with the clamps nice and tight), including on my 1965 Mustang which has a similar Bendix MC and uses the same gasket. When installed as shown in the photo, they never leak. Just by looking at the design of the metal cap, it would seem that the photo reflects the correct orientation.
Also does the metal cap's vent hole normally face the front or back of the car (or it did not matter during assembly back in 1965)?
Thanks
Last edited by RRod; 04-09-2011 at 02:58 AM.
 04-09-2011, 01:13 PM
#2
Le Mans Master


I may have asked this question 5 years ago when I installed a new MC, but the search engine is not working tonight, so I appologize in advance.
1. Do I install this master cylinder cap rubber gasket as shown in the photo? Every new one I've installed facing down seems to leak a bit (even with the clamps nice and tight), including on my 1965 Mustang which has a similar Bendix MC and uses the same gasket. When installed as shown in the photo, they never leak. Just by looking at the design of the metal cap, it would seem that the photo reflects the correct orientation.
Also does the metal cap's vent hole normally face the front or back of the car (or it did not matter during assembly back in 1965)?
Thanks
The two "ears" fit into the recesses of the cap. In the picture, the rubber is actually upside down, as if the cap were off the car and lying on its top. The "bellows" expand down into the cylinder to make up for lost space without creating a vacuum in the cylinder.
04-09-2011, 04:28 PM
#3
Thanks .... very interesting.
 04-09-2011, 04:55 PM
#4
Safety Car

Member Since: Nov 2004
Location: going faster miles an hour...with the radio on in browns mills new jersey
Posts: 4,157
Likes: 0
Received 71 Likes
on
45 Posts

The gasket goes onto the MC as pictured if what the gasket is sitting on were the MC.
The raised portion goes up into the cap.
With the gasket uninstalled, work the bellows.
You'll soon find out which way they work properly.
The raised portion goes up into the cap.
With the gasket uninstalled, work the bellows.
You'll soon find out which way they work properly.
 04-09-2011, 05:08 PM
#6
But we obviously have some differing opinions both here on the Forum and at my local Corvette specialist shop, who bled the brakes last year and installed it with the bellows down into the liquid (which eventually let brake fluid seep out from the rim seal and started to rust the external surface on the MC).
I used to do my own bleeding before back troubles, and always fit the bellows up into the cap and never had leaks in all the previous years.
Other opinions?
 04-09-2011, 08:26 PM
#8
Although I believe toddalin and wmf62 may be incorrect and that my original photo depicts the correct orientation when sitting on the top of the MC (I believe the unexpanded bellows fits up into the raised stepped section of the cap), the photos provided by nassau66427 seem to contradict his very own first reply.
I can actually make the bellows work both ways, plus notice the gasket outer rim's 3 rubber ridges ..... the other side of the gasket outer rim is flat (which would be better designed to seal against the MC's top edge).
Thus I get rim weepage/leakage when the unexpanded bellows is placed down into the reservoir with the 3 ridges attempting to seal against a thin reservoir top lip, and no weepage/leakage when the unexpanded bellows faces up into the cap's raised area designed for it, while the totally flat portion of the gasket's bottom outer rim is properly sealing up against the MC's top rim.
Remember, I can manipulate the bellows both ways.
Other opinions would be welcome .... Thanks
Last edited by RRod; 04-09-2011 at 08:33 PM.
04-09-2011, 08:38 PM
#9
Safety Car
Member Since: Nov 2004
Location: going faster miles an hour...with the radio on in browns mills new jersey
Posts: 4,157
Likes: 0
Received 71 Likes
on
45 Posts
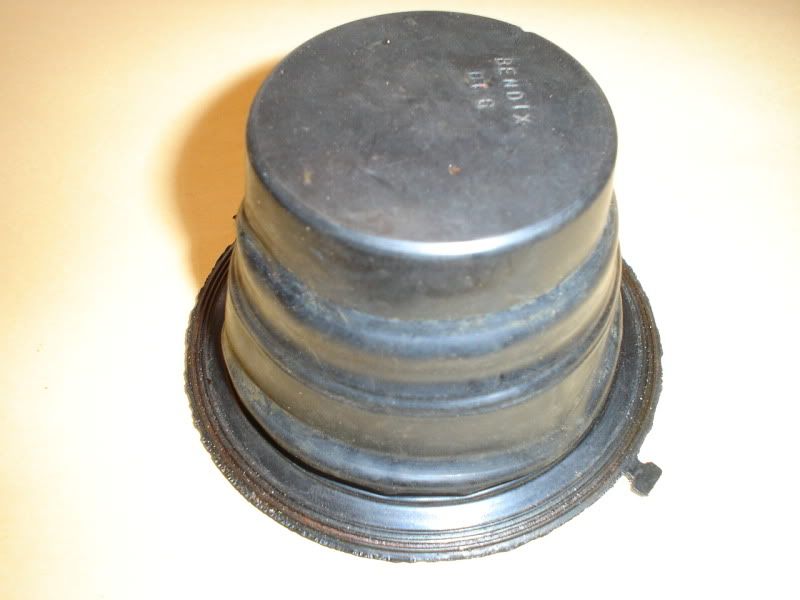
The photos are the same gasket. The first picture shows how it would expand into the reservoir if it were installed per toddalin and wmf62.
The second is how it would react if installed as illustrated in your first pic and my initial response.
I see no contradictions.
The second is how it would react if installed as illustrated in your first pic and my initial response.
I see no contradictions.
04-09-2011, 08:56 PM
#10
Melting Slicks


I agree with toddalin. Note the concentric sealing ridges - these contact the top of the MC to improve the seal.
 100% correct.
  04-09-2011, 09:13 PM
#12
The photos are the same gasket. The first picture shows how it would expand into the reservoir if it were installed per toddalin and wmf62.
The second is how it would react if installed as illustrated in your first pic and my initial response.
I see no contradictions.
The second is how it would react if installed as illustrated in your first pic and my initial response.
I see no contradictions.
Can anyone clarify about rim sealing ridges on both sides of the gasket?
Like I said, my original only had them on one side?
Last edited by RRod; 04-09-2011 at 09:20 PM.
04-09-2011, 09:22 PM
#13
I disagree about the sealing ridges working on the top of the MC better than flat rubber ..... line-up would have to be pertectly correct if depending on the rings to seal.
04-09-2011, 09:27 PM
#14
Le Mans Master


Why would the better sealing surface (the one with the ridges) be towards the cap where there would be NO FLUID INFILTRATION?
Jim
04-09-2011, 09:44 PM
#15
As to the better sealing surface question, my opinion is it would be because once the rubber bellows cracks or fails (which back in 1965 it would in a few years) the upper side seal then becomes critical (thus the 3 sealing rings to ensure the service tech or owner notices leakage through the cap's weep hole as a tell-tale sign that the rubber gasket has failed), while a simple flat rubber interface against the rim of the MC concurently would be the easiest most efficient seal on the lower side.
Last edited by RRod; 04-09-2011 at 09:51 PM.
04-09-2011, 10:16 PM
#16
Melting Slicks

Bought my 66 in 71. The bellows extended down into the mc then. I bought a new mc about 20 years ago, the bellows on that one also extended downward. I never gave it any thought until now! If I overfilled either of them they leaked until the level dropped to about half.. Just a couple of data points...
Harry
See My post #20.. I checked the car and got it backwards... Memory is the first thing to go...
Harry
See My post #20.. I checked the car and got it backwards... Memory is the first thing to go...
Last edited by 66since71; 04-10-2011 at 12:09 PM. Reason: Corrected information
04-09-2011, 10:58 PM
#17
Le Mans Master
My rebuilt '70 M/C used to leak at the lip also. Problem is that the top sealing area gets corroded/thin/wavey/porus/etc., so the bellows don't make good contact.
My solution was to remove the M/C and on a flat surface, rub it on fine sandpaper (AFTER BLOCKING ALL OF THE PORTS) to smooth the lip at the seal. It never leaked after that.
My solution was to remove the M/C and on a flat surface, rub it on fine sandpaper (AFTER BLOCKING ALL OF THE PORTS) to smooth the lip at the seal. It never leaked after that.
04-09-2011, 11:08 PM
#18
Pro

The picture shows the seal upside down. But it really does not matter. The bellows will move either way. If it does not leak one way, use it that way. You should be checking your master cylinder often enough that the fluid should never get low enough to matter.
BTW most leaks are caused by rust on the lip of the master. Make sure the lip is clean metal. If necessary, remove most of the fluid, fill the hole with a clean rag, and file the lip clean, or use a gasket scraper. Wipe the lip clean, and remove the rag, being careful not to get any dirt or rust in the reservoir.
BTW most leaks are caused by rust on the lip of the master. Make sure the lip is clean metal. If necessary, remove most of the fluid, fill the hole with a clean rag, and file the lip clean, or use a gasket scraper. Wipe the lip clean, and remove the rag, being careful not to get any dirt or rust in the reservoir.
Last edited by landshark 454; 04-09-2011 at 11:14 PM.
04-09-2011, 11:51 PM
#19
Bought my 66 in 71. The bellows extended down into the mc then. I bought a new mc about 20 years ago, the bellows on that one also extended downward. I never gave it any thought until now! If I overfilled either of them they leaked until the level dropped to about half.. Just a couple of data points...
Harry
Harry
BTW, page E153 of the 1965 Assembly manual offers no clue as to the orientation of the gasket.
Internet forums of all types are great ..... but anything stated should always be taken with a grain a salt as far as I'm concerned ..... no personal insults intended ..... just a real world fact.
Last edited by RRod; 04-09-2011 at 11:58 PM.
04-10-2011, 10:35 AM
#20
Melting Slicks
Page 36 of the 1965 owner's manual says to fill and maintain the MC at 1/4" from the top. If you then install the cap/gasket with the bellows facing down into the fluild you would raise the level to an overfill status and make a mess (I tried that tonight) ..... add the fact of how the cap was designed to perfectly fit the bellows facing up and it's a no brainer as far as this retired Mechanical Engineer is concerned.
BTW, page E153 of the 1965 Assembly manual offers no clue as to the orientation of the gasket.
Internet forums of all types are great ..... but anything stated should always be taken with a grain a salt as far as I'm concerned ..... no personal insults intended ..... just a real world fact.
BTW, page E153 of the 1965 Assembly manual offers no clue as to the orientation of the gasket.
Internet forums of all types are great ..... but anything stated should always be taken with a grain a salt as far as I'm concerned ..... no personal insults intended ..... just a real world fact.
Not surprised on the assembly manual. It's for the assembly plant. Any thing that arrived there already put together is not detailed.