
How do You Repair A Drivers Door Rear Mirror?
 10-07-2009, 04:01 PM
#1

Hi All,
My 77 door mirror keeps on falling out. I have gone through 4 sets of well nuts already. There is no backing plate inside the door. It is frustrating. Has anyone here ever had this problem and has a fix?
Thanks
Jack
77 C3
My 77 door mirror keeps on falling out. I have gone through 4 sets of well nuts already. There is no backing plate inside the door. It is frustrating. Has anyone here ever had this problem and has a fix?
Thanks
Jack
77 C3
 10-07-2009, 04:09 PM
#2
Team Owner


Member Since: Jun 2000
Location: Southbound
Posts: 38,928
Likes: 0
Received 1,471 Likes
on
1,250 Posts
Cruise-In II Veteran

Post a pic of the mirror's location. There is a tapping plate in the door and I'm wondering whether you've missed it.

 10-07-2009, 07:48 PM
#4
I have been working on cars for years. I went in there with the door panel off, I put a heavy magnet that can pick up 5 lbs over the area with no grab. I used lights down in the door, mirror holes and then up with a goose neck lamp. I used a snake and I fished for a plate. Nothing, the person that had it before me somehow removed it. I might get a piece of 1/16 or thicker inch steel, put it under the mirror gasket and mark holes. I can then tap & thread it, put it inside the door, hold it with the heavy magnet, put on one bolt then the other and hope that it will stay.
But, is there another or easier way?
Thanks
Jack
10-07-2009, 08:10 PM
#5
Melting Slicks

10-07-2009, 10:23 PM
#7
Former Vendor
Member Since: Aug 2006
Location: Jeffersonville Indiana 812-288-7103
Posts: 76,656
Received 1,816 Likes
on
1,461 Posts
St. Jude Donor '08-'09-'10-'11-'12-'13-'14-'15

Sorry guys,
I have been working on cars for years. I went in there with the door panel off, I put a heavy magnet that can pick up 5 lbs over the area with no grab. I used lights down in the door, mirror holes and then up with a goose neck lamp. I used a snake and I fished for a plate. Nothing, the person that had it before me somehow removed it. I might get a piece of 1/16 or thicker inch steel, put it under the mirror gasket and mark holes. I can then tap & thread it, put it inside the door, hold it with the heavy magnet, put on one bolt then the other and hope that it will stay.
But, is there another or easier way?
Thanks
Jack
I was moving one over the other when I discovered the well nuts shown in the 77 aim. I was shocked since I've never seen a driver side mirror mounted with well nuts and even owned a 77 with chrome mirrors.
I've replaced that bracket in the door before and I did it by removing material from the outer door skin until I could feed a new fabricated bracket in the door. You can not access this from inside the door due to the door reinforcement so if there is a replacement made it has to be done from the outside. The original mirror brackets were held to the outer door panel skin with two aluminum rivets.
There is no room between that large panel reinforcement that runs horizontally inside the door.
I'm not saying the AIM is right, but it does present an interesting question.
Willcox
 10-08-2009, 12:47 AM
#8
Racer

Member Since: Dec 2007
Location: El Dorado Hills California
Posts: 297
Likes: 0
Received 1 Like
on
1 Post
Here is what I did:
First a thin plate will only have a couple of threads unless a nut is welded to the back. If that is done you probably won't get it in place.
My answer is nut-zerts. Several trade names. If interested I'll get part numbers from my inventory.
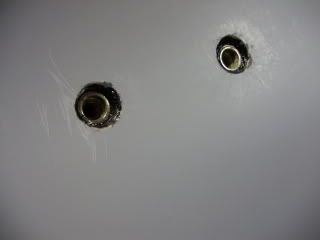
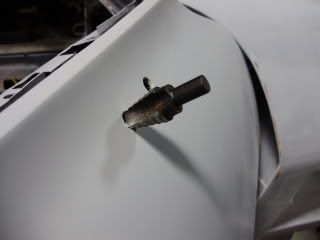 Holes in door opened up to acommodate shoulder on insert
 Pop rivet like tool to set insert
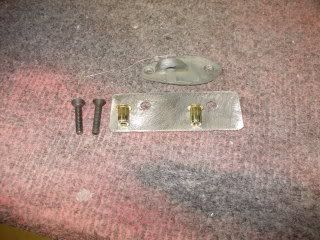 Plate, inserts, screws and base plate for measurements
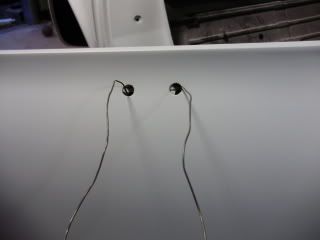 Plate located with fish wire
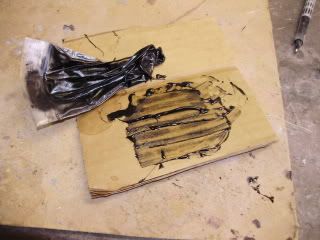 Epoxy in a grout bag. OK, really the corner of a zip lock sandwich bag
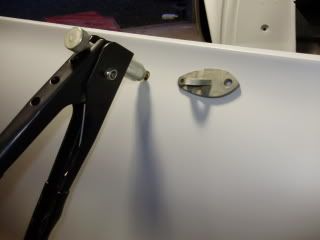
 Finished job
I posted these out of order.
Open up holes in door, Fish drilled plate into position, set inserts, apply epoxy into openings (with the intention of getting plenty on the plate to hold it in place for ever), being careful not to get it into threads. I wrapped long screws with masking tape and threaded into the insets to protect the threads while getting epoxy into place, one at a time swap out those long screws with screws that are equivalant in length to the final mounting screws and mount the base plate, tighten screws clean up excess epoxy and wait for it to cure.
I have more photos if you need more detail-PM me.
Blain
First a thin plate will only have a couple of threads unless a nut is welded to the back. If that is done you probably won't get it in place.
My answer is nut-zerts. Several trade names. If interested I'll get part numbers from my inventory.
Holes in door opened up to acommodate shoulder on insertPop rivet like tool to set insertPlate, inserts, screws and base plate for measurementsPlate located with fish wireEpoxy in a grout bag. OK, really the corner of a zip lock sandwich bagFinished jobI posted these out of order.
Open up holes in door, Fish drilled plate into position, set inserts, apply epoxy into openings (with the intention of getting plenty on the plate to hold it in place for ever), being careful not to get it into threads. I wrapped long screws with masking tape and threaded into the insets to protect the threads while getting epoxy into place, one at a time swap out those long screws with screws that are equivalant in length to the final mounting screws and mount the base plate, tighten screws clean up excess epoxy and wait for it to cure.
I have more photos if you need more detail-PM me.
Blain
 10-10-2009, 01:39 AM
#10
Check out this diagram.
http://www.keenparts.com/pages/Catal...p?diagram=3205
http://www.keenparts.com/pages/Catal...p?diagram=3205
10-10-2009, 09:28 AM
#11
Team Owner
An excellent solution that is similar...or better than...the original design. Be certain to use something to reach inside the door and clean the surface being epoxied. Otherwise it may only work for the first mirror assembly, then dis-bond from vibration over time.
10-10-2009, 05:30 PM
#12
Former Vendor
Member Since: Aug 2006
Location: Jeffersonville Indiana 812-288-7103
Posts: 76,656
Received 1,816 Likes
on
1,461 Posts
St. Jude Donor '08-'09-'10-'11-'12-'13-'14-'15
Blain:
Love this idea and I have some of these in the shop. . . I'll have to make notes in our books about this for the next time! Great idea for a very hard fix!
If GM had just cut a notch in the door reinforcement for access this problem would not exist.
Willcox
Love this idea and I have some of these in the shop. . . I'll have to make notes in our books about this for the next time! Great idea for a very hard fix!
If GM had just cut a notch in the door reinforcement for access this problem would not exist.
Willcox
05-12-2017, 03:21 PM
#14
8th Gear

Member Since: Dec 2015
Posts: 8
Likes: 0
Received 0 Likes
on
0 Posts
Here is what I did:
First a thin plate will only have a couple of threads unless a nut is welded to the back. If that is done you probably won't get it in place.
My answer is nut-zerts. Several trade names. If interested I'll get part numbers from my inventory.
Holes in door opened up to acommodate shoulder on insert
Pop rivet like tool to set insert
Plate, inserts, screws and base plate for measurements
Plate located with fish wire
Epoxy in a grout bag. OK, really the corner of a zip lock sandwich bag
Finished job
I posted these out of order.
Open up holes in door, Fish drilled plate into position, set inserts, apply epoxy into openings (with the intention of getting plenty on the plate to hold it in place for ever), being careful not to get it into threads. I wrapped long screws with masking tape and threaded into the insets to protect the threads while getting epoxy into place, one at a time swap out those long screws with screws that are equivalant in length to the final mounting screws and mount the base plate, tighten screws clean up excess epoxy and wait for it to cure.
I have more photos if you need more detail-PM me.
Blain
First a thin plate will only have a couple of threads unless a nut is welded to the back. If that is done you probably won't get it in place.
My answer is nut-zerts. Several trade names. If interested I'll get part numbers from my inventory.
Holes in door opened up to acommodate shoulder on insertPop rivet like tool to set insertPlate, inserts, screws and base plate for measurementsPlate located with fish wireEpoxy in a grout bag. OK, really the corner of a zip lock sandwich bagFinished jobI posted these out of order.
Open up holes in door, Fish drilled plate into position, set inserts, apply epoxy into openings (with the intention of getting plenty on the plate to hold it in place for ever), being careful not to get it into threads. I wrapped long screws with masking tape and threaded into the insets to protect the threads while getting epoxy into place, one at a time swap out those long screws with screws that are equivalant in length to the final mounting screws and mount the base plate, tighten screws clean up excess epoxy and wait for it to cure.
I have more photos if you need more detail-PM me.
Blain
That's a great write up about the mirror repairs. If you could send me some more pictures I need to do the same for the passenger side on my 78.
Thanks,
Scott
05-13-2017, 01:44 AM
#15
Burning Brakes

Blains' stats:
Most Recent Message: 07-02-2011 08:29 PM
Good luck getting a reply.
