Notices
C6 Corvette ZR1 & Z06 General info about GM’s Corvette Supercar, LS9 Corvette Technical Info, Performance Upgrades, Suspension Setup for Street or Track
Sponsored by:
Sponsored by: Kraken

My 2007 Z0HHHH6

Thread Tools
 
Search this Thread
 
Old 03-23-2022, 12:46 AM
  #21  
Hib Halverson
Pro Mechanic
Pro Mechanic
 
Hib Halverson's Avatar
 
Member Since: Oct 1999
Location: South-Central Coast California
Posts: 3,560
Received 1,176 Likes on 614 Posts

Default

Wow! This looks like a bitchin' build.

But...your information says you're in San Diego. How are you going to get the engine to pass the new, CVN verification part of the CA Smog Check? I ask because I have a less aggressive LS7 build which I'm trying to get to pass the Smog Check. Maybe whatever you're going to do, or are doing along those lines can help me, too.
Old 03-23-2022, 01:14 AM
  #22  
Dj_or_dj
Burning Brakes
Thread Starter
 
Dj_or_dj's Avatar
 
Member Since: May 2013
Location: San diego Ca
Posts: 1,032
Received 205 Likes on 144 Posts

Default

Originally Posted by Hib Halverson
Wow! This looks like a bitchin' build.

But...your information says you're in San Diego. How are you going to get the engine to pass the new, CVN verification part of the CA Smog Check? I ask because I have a less aggressive LS7 build which I'm trying to get to pass the Smog Check. Maybe whatever you're going to do, or are doing along those lines can help me, too.
Thanks man! I am going to DM you.
Old 03-23-2022, 01:26 AM
  #23  
Dj_or_dj
Burning Brakes
Thread Starter
 
Dj_or_dj's Avatar
 
Member Since: May 2013
Location: San diego Ca
Posts: 1,032
Received 205 Likes on 144 Posts

Default

Originally Posted by Hib Halverson
Wow! This looks like a bitchin' build.

But...your information says you're in San Diego. How are you going to get the engine to pass the new, CVN verification part of the CA Smog Check? I ask because I have a less aggressive LS7 build which I'm trying to get to pass the Smog Check. Maybe whatever you're going to do, or are doing along those lines can help me, too.
Check your messages

Last edited by Dj_or_dj; 03-23-2022 at 01:50 AM.
Old 03-23-2022, 06:54 AM
  #24  
Dj_or_dj
Burning Brakes
Thread Starter
 
Dj_or_dj's Avatar
 
Member Since: May 2013
Location: San diego Ca
Posts: 1,032
Received 205 Likes on 144 Posts

Default

I found pictures and edited the blog for a more chronological transformation. I have had a lot of issues with this thing and just wanted to make this as detailed and correct as possible

here are links to other posts on the head issues i have made.

https://www.corvetteforum.com/forums/c6-corvette-zr1-and-z06/4524120-it-happened-to-me-8.html

https://www.corvetteforum.com/forums/c6-corvette-general-discussion/4466856-a-bit-of-news-concerning-ahp.html#post1602529673


Last edited by Dj_or_dj; 03-23-2022 at 07:25 AM.
Old 03-24-2022, 01:32 PM
  #25  
Dj_or_dj
Burning Brakes
Thread Starter
 
Dj_or_dj's Avatar
 
Member Since: May 2013
Location: San diego Ca
Posts: 1,032
Received 205 Likes on 144 Posts

Default

Originally Posted by acroy
OK got it Can't go too far wrong.
I forgot to mention that, I will be re-locating soon so that put a damper on doing the build the way I wanted to initially do.
Old 03-24-2022, 06:26 PM
  #26  
Dj_or_dj
Burning Brakes
Thread Starter
 
Dj_or_dj's Avatar
 
Member Since: May 2013
Location: San diego Ca
Posts: 1,032
Received 205 Likes on 144 Posts

Default

Guess who is going to be busy within the next few days....

i am just waiting for my clutch slave cylinder and rear main seal install tool. Then the short block can be installed into the car.


many many pictures to come.


Valley cover gasket

Front cover gasket

Rear main seal assembly


Crankshaft front seal


Engine mounts


I bought two rear main seal sets just incase I have to replace the cover plate.
Old 03-27-2022, 07:36 PM
  #27  
Dj_or_dj
Burning Brakes
Thread Starter
 
Dj_or_dj's Avatar
 
Member Since: May 2013
Location: San diego Ca
Posts: 1,032
Received 205 Likes on 144 Posts

Default

made some progress today


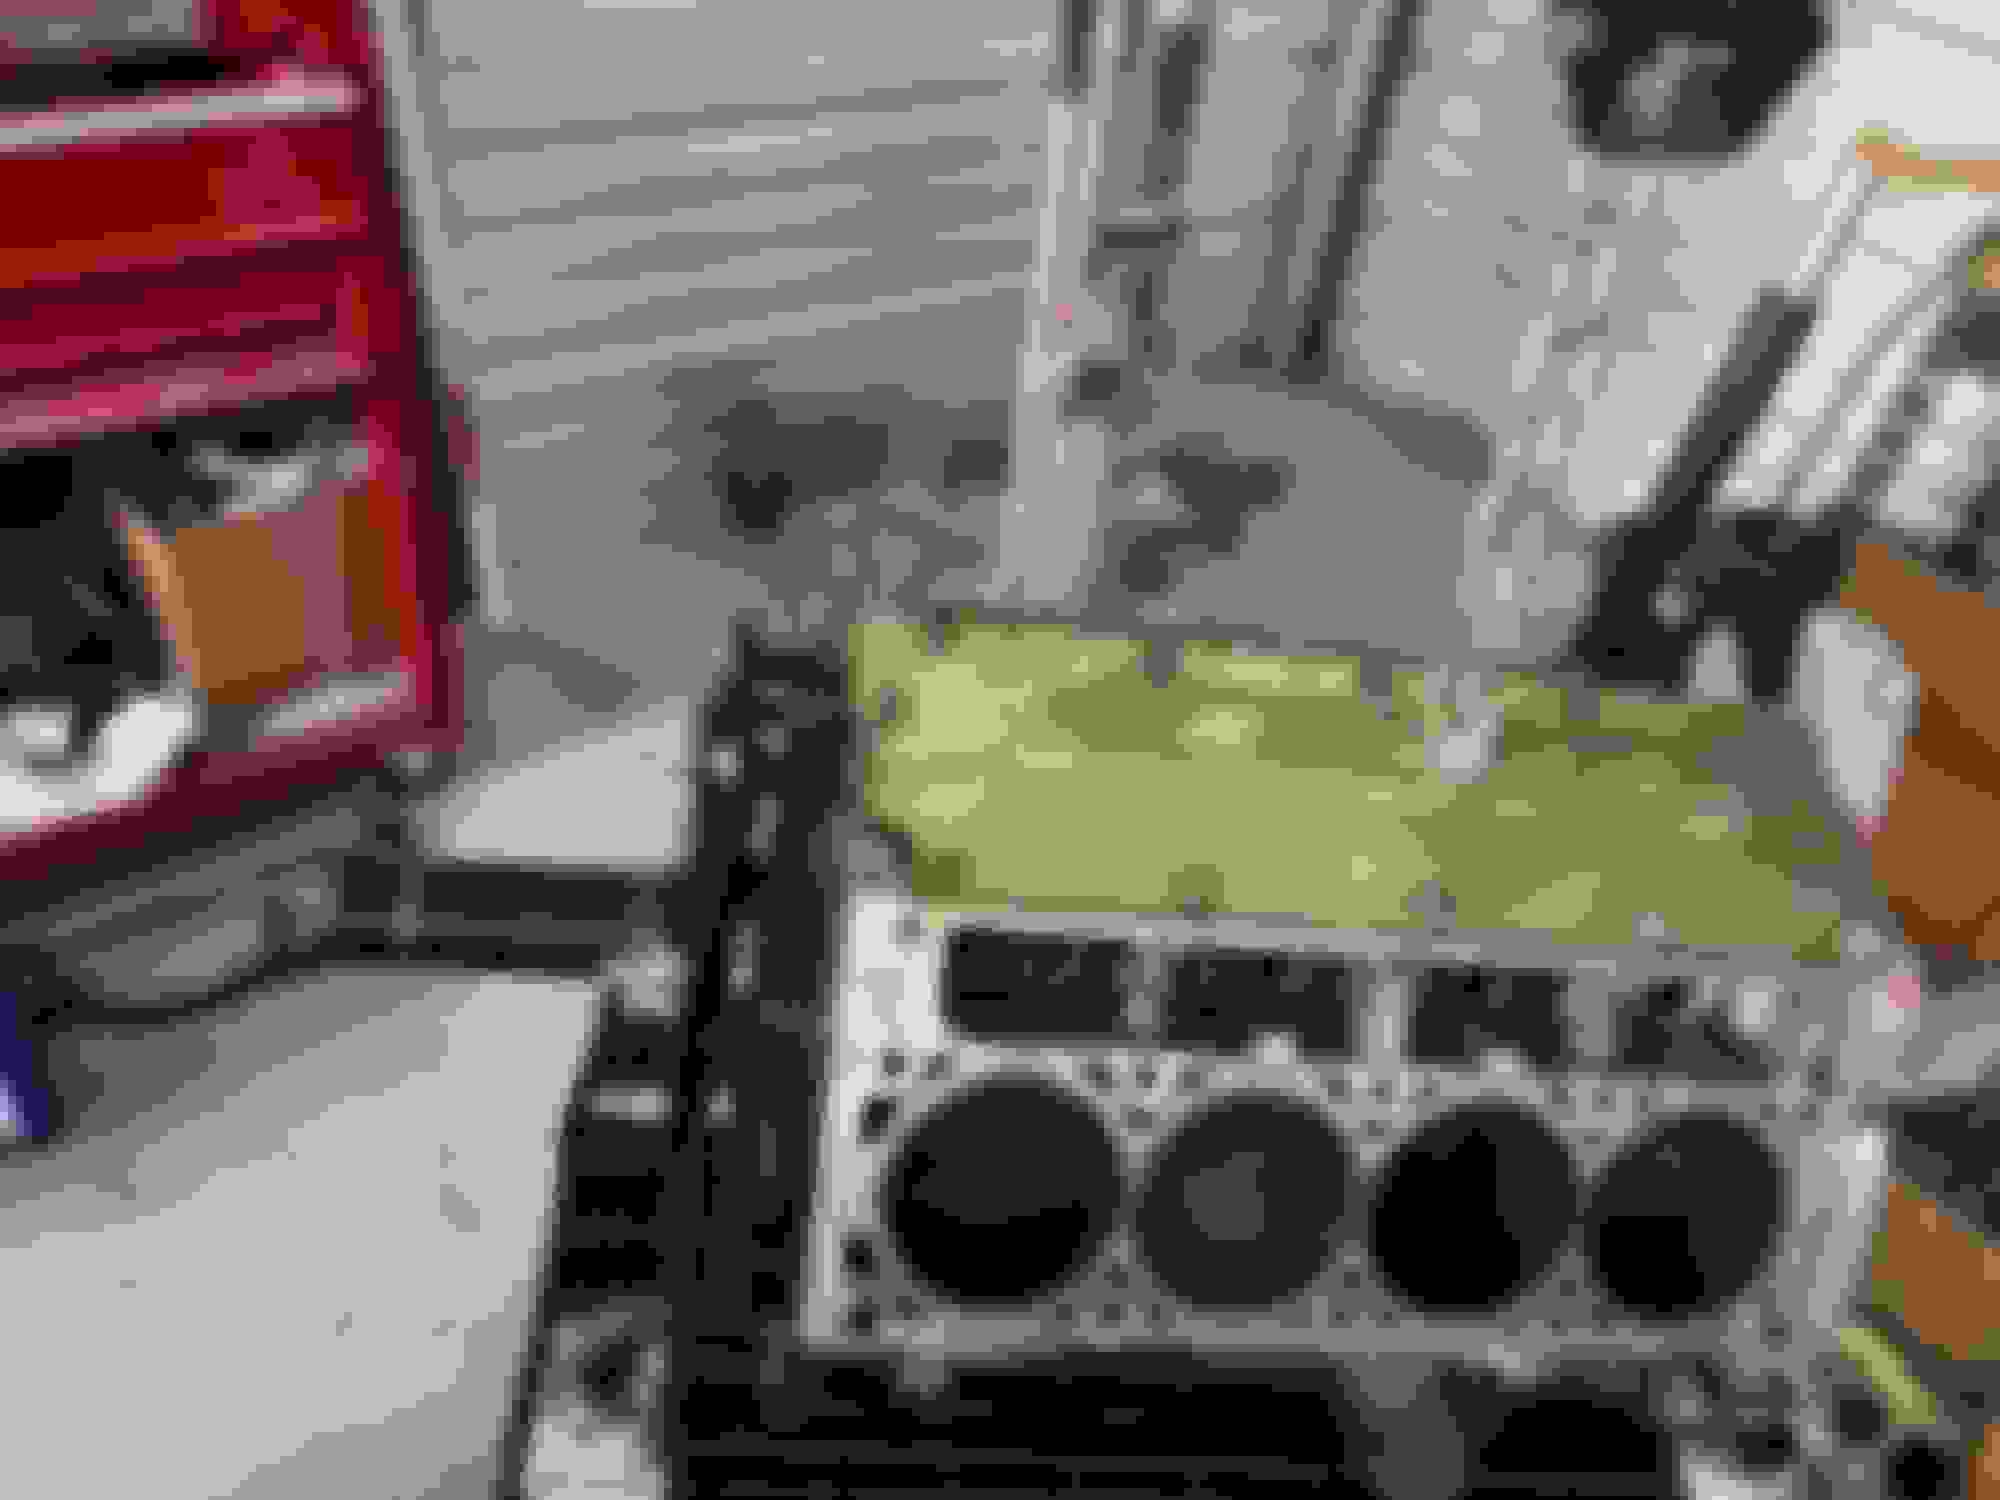
Parts arrived!!!

Waiting on one last tool


Installed oil pump (loosely)

Removed flywheel


Lubed up the bottom end


Crankshaft oil deflector


Torqued to spec

Covered up for next weekend.
The following 2 users liked this post by Dj_or_dj:
DougHG8 (03-27-2022), Pb82 Ronin (03-27-2022)
Old 04-02-2022, 10:57 PM
  #28  
Dj_or_dj
Burning Brakes
Thread Starter
 
Dj_or_dj's Avatar
 
Member Since: May 2013
Location: San diego Ca
Posts: 1,032
Received 205 Likes on 144 Posts

Default

Here are the happenings of today:


I ordered a Oil Barbell to tighten up the oil passages and get rid of the plastic OEM piece.


cleaned the surfaces so I can install gaskets:

Oil pan
Timing cover
Rear crankshaft cover gasket

Will be installing:

Front Crank Seal
Rear Main Seal


Prepped the surface for Oil Pan Gasket:

** NOTE ** There are two rivets that hold the OEM Oil Pan Gasket in place. I will be re-installing them.


Timing cover gasket area prepped and ready


Up and down she goes.


Someone was Leaking ALOT.


all bolts removed


That orange piece OEM Oil Passage Barbell


drilled into it less than 1/16"


screwed this in


pulled it out easy!


new barbell


and we have an issue.... YEP IT BROKE!!!


opened up the oil passage


punched the freeze plug out


there it is...


yep its in there


3/8" extensions .... ALOT of them


got it to the end


couple whacks w a hammer


and its out


I ordered a new Oil passage Barbell and am waiting for delivery.

I will be installing the Timing cover, Oil pan, rear main seal tomorrow.

Last edited by Dj_or_dj; 04-02-2022 at 11:24 PM.
Old 04-03-2022, 10:01 PM
  #29  
Dj_or_dj
Burning Brakes
Thread Starter
 
Dj_or_dj's Avatar
 
Member Since: May 2013
Location: San diego Ca
Posts: 1,032
Received 205 Likes on 144 Posts

Default


Old 04-05-2022, 10:58 PM
  #30  
zrc3john
Melting Slicks
 
zrc3john's Avatar
 
Member Since: Jul 2015
Posts: 2,430
Received 367 Likes on 267 Posts
Default


From one 07 velocity yellow to another ..Good luck with that build ..I bought mine totally done ..I’m retired..I couldn’t imagine even attempting what you are doing ....Good luck with everything....
The following users liked this post:
Landru (07-20-2023)
Old 04-06-2022, 05:13 PM
  #31  
Dj_or_dj
Burning Brakes
Thread Starter
 
Dj_or_dj's Avatar
 
Member Since: May 2013
Location: San diego Ca
Posts: 1,032
Received 205 Likes on 144 Posts

Default

Originally Posted by zrc3john


From one 07 velocity yellow to another ..Good luck with that build ..I bought mine totally done ..I’m retired..I couldn’t imagine even attempting what you are doing ....Good luck with everything....

THANK YOU MAN!!!!

yeah I am $10k into a $3000 build LOL!!!

same to you. Good luck!!

The following 2 users liked this post by Dj_or_dj:
got2hav1 (09-17-2022), zrc3john (04-06-2022)
Old 04-06-2022, 10:54 PM
  #32  
Bruzer427
Heel & Toe
 
Bruzer427's Avatar
 
Member Since: May 2020
Location: Stoney Creek, ON
Posts: 24
Received 25 Likes on 9 Posts
Default

Nicely documented build, that was a fun read through
The following users liked this post:
Landru (07-20-2023)
Old 04-07-2022, 01:42 AM
  #33  
REDZED2
Melting Slicks
 
REDZED2's Avatar
 
Member Since: Sep 2005
Location: Winnipeg
Posts: 2,567
Received 207 Likes on 165 Posts

Default

Comp cam???? YIKES!! Lobes? Those specs make no sense. .612 lift? What rocker ratio. Otherwise BRAVO! PICS AND ALL FINE SIR. GREAT LOOKING JOB!
The following users liked this post:
Z06Kevin (07-20-2022)
Old 04-07-2022, 03:51 AM
  #34  
jayyyw
Le Mans Master
 
jayyyw's Avatar
 
Member Since: Jun 2015
Location: Austin Tx
Posts: 5,673
Received 911 Likes on 697 Posts
Default

Originally Posted by REDZED2
Comp cam???? YIKES!! Lobes? Those specs make no sense. .612 lift? What rocker ratio. Otherwise BRAVO! PICS AND ALL FINE SIR. GREAT LOOKING JOB!
.648" lift with a 1.8 ratio
Old 04-10-2022, 12:06 PM
  #35  
Dj_or_dj
Burning Brakes
Thread Starter
 
Dj_or_dj's Avatar
 
Member Since: May 2013
Location: San diego Ca
Posts: 1,032
Received 205 Likes on 144 Posts

Default

Originally Posted by Bruzer427
Nicely documented build, that was a fun read through

Thank you.

I am still waiting for a few more little things to arrive before I can install the bottom end back into the cradle.
Old 04-10-2022, 02:34 PM
  #36  
Dj_or_dj
Burning Brakes
Thread Starter
 
Dj_or_dj's Avatar
 
Member Since: May 2013
Location: San diego Ca
Posts: 1,032
Received 205 Likes on 144 Posts

Default

[QUOTE=REDZED2;1604970928]Comp cam???? YIKES!! Lobes? Those specs make no sense. .612 lift? What rocker ratio. Otherwise BRAVO! PICS AND ALL FINE SIR. GREAT LOOKING JOB![/QUOTEyx]


Yesir Comp Cams,

Yella Terra Ultra lite 1.8:1 roller rocker;

Jayyyw nailed the lift @ .648" compared to my last cam .635".

( TSP 2.2 was 112.5 lsa .635" with 1.8:1 rocker ratio; had 15 degrees of overlap) I loved the way the cam felt with stock OEM heads but this is going to be a very different build in the end.

Overall lift between the two cams is about .018" but as we all know its not all about lift. So we decided to add a bit duration in the mix too.

237* int
251* exh

I wanted the car to retain some personality at idle so this cam only adds 1/2 a degree towards a "smoother idle" 113 lsa +4 adv and adds 3 degrees of over lap totaling 18 degrees. Which should help give the car a decent bottom end and a good mid range that will pull all the way up to the top.
Old 04-11-2022, 08:07 PM
  #37  
skim
Intermediate
 
skim's Avatar
 
Member Since: Apr 2020
Location: SoCal
Posts: 38
Likes: 0
Received 11 Likes on 4 Posts
Default

Wow.. you're just a different beast lol
Curious from someone who's only done valve adjustment on a S2k before (the most I've opened up an engine), do you have prior experience disassembling an engine or are you more like a "how hard can it be" warrior? lol
The following users liked this post:
Landru (07-20-2023)

Get notified of new replies

To My 2007 Z0HHHH6

Old 04-11-2022, 08:58 PM
  #38  
Dj_or_dj
Burning Brakes
Thread Starter
 
Dj_or_dj's Avatar
 
Member Since: May 2013
Location: San diego Ca
Posts: 1,032
Received 205 Likes on 144 Posts

Default

Originally Posted by skim
Wow.. you're just a different beast lol
Curious from someone who's only done valve adjustment on a S2k before (the most I've opened up an engine), do you have prior experience disassembling an engine or are you more like a "how hard can it be" warrior? lol
LOL!! THANKS.

No I'm no different anything. My father was a mechanic growing up, I picked a thing or two up from him. This is the second time that I have taken this LS7 apart. I have disassembled/assembled an engine or two in my day.

I am just taking my sweet time. Making sure every bolt is torqued. And enjoying every opportunity I have to make sure this thing is well put together.

How hard can it be warrior?? Nah.

I am just following the instructions out of my 800 page Factory engine service manual and doing whatever it says for me to do LOL.

If you see I reference the book any time I tighten anything down. Adjusting valves is actually more complex than whatever it is I am doing LOL!

I'll be posting more pics soon; I anticipate within a week or two.

Now that the bottom end is all closed up, I will be plugging all the port holes and cleaning all that oil and grime up so its nice and pretty prior to install.


Last edited by Dj_or_dj; 04-12-2022 at 04:17 PM.
The following users liked this post:
Landru (07-20-2023)
Old 04-12-2022, 04:17 PM
  #39  
Dj_or_dj
Burning Brakes
Thread Starter
 
Dj_or_dj's Avatar
 
Member Since: May 2013
Location: San diego Ca
Posts: 1,032
Received 205 Likes on 144 Posts

Default

This is what is still remaining


HEHEHE MY PRETTY!!!

Parts left to install while engine is out:


Mantic twin disc clutch and flywheel.
OEM clutch master cylinder.
OEM slave cylinder.
Bell housing.
Motor mounts.
Short block into cradle.


Parts to install when short block goes into cradle:

Mamo Motorsports (MMS) 265 Stage 1 heads 406cfm.
YT 8mm rockers.
Manton push rods
Johnson Link-bar lifters. 093" Total Plunger Travel.
Cometic .040" head gasket.
OEM Intake for now.
Mamo Ported OEM silver blade TB.
JBA 1-7/8" D-shape primaries & x-pipe.

Upgrades to come after it is running and broken in.
MAMO MSD.
ARH 2" primaries & X-pipeLT's.


To be continued ...

Last edited by Dj_or_dj; 07-17-2022 at 01:09 AM.
The following users liked this post:
ZRCLONE (04-15-2022)
Old 04-15-2022, 03:48 PM
  #40  
grinder11
Race Director
 
grinder11's Avatar
 
Member Since: Oct 2004
Posts: 10,606
Received 3,698 Likes on 2,619 Posts

Default

Sounds like an awesome build!! What's not to like??? Also, I really like you're staying with 8mm rocker bolts. I think people are sometimes carrying a bit of original SBC tech into the LS arena. I did for a bit. Anyway, if it was an 8mm rocker STUD, YES, that would suck. But it's NOT, so it doesn't!! That 8mm (probably a 10.9 fastener) bolt can apply tons and tons of pressure to keep the rocker in its 'nest'. 450-500lb springs OTN won't phase an 8mm, 10.9 bolt in the least. Haven't looked up the tensile strength, or the amount of force it can apply. But I do remember a 1/4-20 nut can apply many tons of pressure, and the 8mm is much beefier yet. My LS7 has a bit smaller cam than yours. It's a Futral/Cam Motion grind. Mine has .603"/.608" lift, duration is 232°/250°, LSA is 112°, +4°. It has 17° overlap. As for streetability, I get 21-22mpg on the expressways, 14-15 around town, and its an A4 vert with a 3,200 stall Yank. Very little problem with bucking/surging. No, I'm not here to tell you it drives "just like stock", because it doesn't. But it does drive EXACTLY like stock once you're at any speed over 55mph in OD.....EXCEPT for the acceleration part!!! TRUTH!!! Best of luck on your build......


Quick Reply: My 2007 Z0HHHH6


All times are GMT -4. The time now is 07:51 AM.