How-to: Add 2nd Auxiliary radiator (a.k.a. V09 mod)
 08-26-2023, 03:39 AM
#1
Sr.Random input generator

Thread Starter

Background: It depends on many factors, from local temps, to track configurations, to driving style, but in my neck of woods (Pacific Northwest), my '23 C8 Z51 has been running pretty hot (coolant around 240 degrees F) even when I ran it at temps as low as 75 degrees F. The car loses substantial power at those levels, and you start 'losing' : ) Thanks to our community discussions, it was discovered that export cars sent to 'hot' countries actually get shipped from the factory with an additional auxiliary radiator on the driver side rear pod location. Looks like GM decided us Americans don't need it, and they replaced the radiator with a plastic grill for our market. This is my attempt to add it back.
What you need:
WARNING: This car platform (mid engine C8) is very hard to work on, and this project was also pretty demanding, even for simple steps. You are forewarned. If you follow, you're also doing it at your own risk. If you make mistakes, you can cause harm to your car, others, or yourself.
1. Open hood and trunk, and disconnect the battery..
Since we're messing with a fan, and will need to unplug things to open up space, it makes sense to get the battery disconnected. Before doing that, though, make sure you open the trunk.
2. Put the car on the lift/jacks and remove driver rear side wheel/tire.

Next up, remove the wheel liner. It is held in place by 2 plastic retainers, many T15, and a few 7mm bolts at the bottom,
3. Remove the fake radiator.

Our cars already come with everything we'd need to install the radiator, including mounts, fan, etc. All we need to do is to remove the fake unit : P

How it looks with the fan removed.

You have to remove the bottom mount to be able to remove the fake radiator. It is held in place by 3 x 10mm bolts. The third one is not easy to see, but it's there.

They're out!

... just look at the huge opening that will feed the radiator...
4. Assemble and install the aux radiator.

Assemble the radiator along with the ducting. You can also reuse the ducting of the fake radiator, but it doesn't have that air baffle in front of it; your choice. I reused the plastic retainers (screws) of the fake radiator as well.

Tip: don't install the fan onto the assembly until everything is in, which makes it easier to install with more wiggle room. The radiator core took about 800 ml of coolant. Make your concoction per your desires (I did 30%), and fill it as much as you can to reduce air in the system.
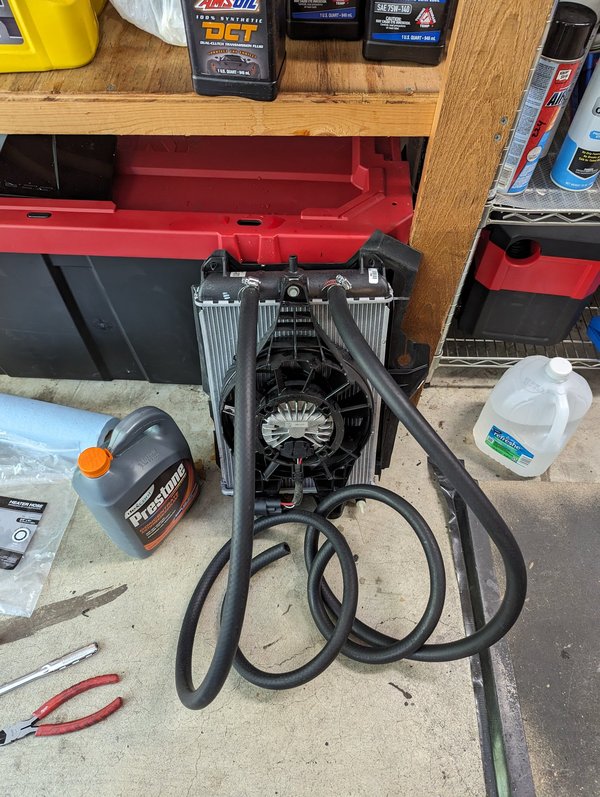
Attach the hoses and put clamps on them. Now we have an octopus.

Finally, move these fuel overfill dump line retainers. You can reach at the line during install, before installing the fan.

I used 2 of these hoses from local O'Reilly's.

Now reinstall time. First align top pin with its hole, and then push the assembly up.

Then comes the hard part. Due to small clearances, I struggled to properly reinstall the bottom mount for a while. Later, I sprayed a bit of WD-40 to the holes, which made it much easier and 'possible' for me to align everything and start putting 3 x 10 mm bolts back in. Good luck!
5. Route and connect the hoses,
We'll soon remove a hose, and it made quite a bit of mess when I removed it. I think the best way to handle it is still just removing the line and putting a bucket in preparation, since it will make refill and getting airs out easier (compared to complete drain). It's your choice!
EDIT (ALTERNATIVE TOP ROUTING): I am running 345 tires with very high camber, and it rubs my wheel liner a bit. Due to this, I later moved my hoses to go from the top, and below is the pic. You can either do it this way and skip the wheel liner routing (and I recommend using a DEI heat wrap as well for this one), or follow the remaining steps.

This is the alternative routing that goes in from the top. I've used 2xDEI heat wraps for additional insulation:


The OEM setup uses the top opening for routing the hoses towards the engine. This puts the hoses pretty close to the headers, and I don't think it's the best idea, at least without some insulation. In my case, I realized I can route the lines far far away from the header by making a small modification. That bracket I'm pointing at needs to go, so that you can bundle the lines with that big harness and safely tuck it under the wheel liner. It is held in place by one plastic retainer, and a few small zip ties. Second pic shows it removed.

Look at that; nice and bundled! You can then route the hoses towards the engine from (behind) where the brake hard line connection is.
At this point, temporarily install the wheel liner back to confirm that the lines are tucked behind it safely, and are not close to the tires, etc, or making any bumps on the liner. Don't skip this step.

V09 splices into the oil cooler's input line as show in the pic above. We need to remove the soft part of the line (1) in this pic. The direction of flow is from the top connection (coming from the engine) to the bottom (oil cooler).

Easier said than done. This was the hardest part of the project for me. The clamps were facing away on both ends, and they're different size! The bottom one is 7mm, and the top is 8mm. I was able to reach the top one using a swivel head 1/4" ratchet, but the bottom one was not easily accessible. I ended up forcing the clamp to turn a bit with a long screw driver, after which I had a small access to slowly loosen it with a long flat head. Good luck!!!

It looks like this when removed.

Create this by using hose elbows. After doing this, I had to cut down the length of the one for the hard line hose coming from the top, since it would not clear the engine mount. The bottom one has space, so a bit longer hose is OK. Keep in mind, these will need to move a little as the engine rocks back and forth.

Sorry for the dark pic. Here they are installed. To make it much easier on you, lace the inside of the hoses with coolant before trying to put them on. If the hoses are dry, they will get progressively harder to push forward, and you might get stuck (I did on one of them).

Now comes the routing part. As you can see from the pic above, the top radiator port rear of the car needs to plug into the oil cooler core side (bottom connection), and the port to the front of the car needs to plug into the hose coming from the engine (top).

Here's a pic with the bottom (oil cooler) side connected to the hose already, and the one coming from the top pending.
6. Leak checks, reassembly.
Reassembly time! Start with the liner.

Don't tighten the bottom bolts before every bolt is in its hole. Otherwise, it's easy to misalign.

Tired of 14EP? You can switch to any flanged M8x25-1.5 bolt like I did.
7. DONE! Time to test drive.
Now it's time for a test drive. You should check the coolant level often for the next few drives as the car bumps its air pockets out.
8. Optional: Inline thermostat.
See post 20!
I hope this helps : )
What you need:
- Sockets / Tips: 7, 8, 10, 13, 14EP, T15.
- 2 x 6ft heater hose (available at local auto stores).
- 8 x clamps for 5/8" hose.
- 2 x heater hose elbow
- OEM AUX radiator 23429489
- OEM AUX radiator front duct 23428551
- Dexcool coolant concentrate (1 gal was more than enough for me; total system is about 23 quarts but you never drain the whole system).
- (Optional) DEI heat sleeves if you choose to route hoses from the top (see step 5 for more info):
WARNING: This car platform (mid engine C8) is very hard to work on, and this project was also pretty demanding, even for simple steps. You are forewarned. If you follow, you're also doing it at your own risk. If you make mistakes, you can cause harm to your car, others, or yourself.
1. Open hood and trunk, and disconnect the battery..
Since we're messing with a fan, and will need to unplug things to open up space, it makes sense to get the battery disconnected. Before doing that, though, make sure you open the trunk.
2. Put the car on the lift/jacks and remove driver rear side wheel/tire.
Next up, remove the wheel liner. It is held in place by 2 plastic retainers, many T15, and a few 7mm bolts at the bottom,
3. Remove the fake radiator.
Our cars already come with everything we'd need to install the radiator, including mounts, fan, etc. All we need to do is to remove the fake unit : P
How it looks with the fan removed.
You have to remove the bottom mount to be able to remove the fake radiator. It is held in place by 3 x 10mm bolts. The third one is not easy to see, but it's there.
They're out!
... just look at the huge opening that will feed the radiator...
4. Assemble and install the aux radiator.
Assemble the radiator along with the ducting. You can also reuse the ducting of the fake radiator, but it doesn't have that air baffle in front of it; your choice. I reused the plastic retainers (screws) of the fake radiator as well.
Tip: don't install the fan onto the assembly until everything is in, which makes it easier to install with more wiggle room. The radiator core took about 800 ml of coolant. Make your concoction per your desires (I did 30%), and fill it as much as you can to reduce air in the system.
Attach the hoses and put clamps on them. Now we have an octopus.
Finally, move these fuel overfill dump line retainers. You can reach at the line during install, before installing the fan.
I used 2 of these hoses from local O'Reilly's.
Now reinstall time. First align top pin with its hole, and then push the assembly up.
Then comes the hard part. Due to small clearances, I struggled to properly reinstall the bottom mount for a while. Later, I sprayed a bit of WD-40 to the holes, which made it much easier and 'possible' for me to align everything and start putting 3 x 10 mm bolts back in. Good luck!
5. Route and connect the hoses,
We'll soon remove a hose, and it made quite a bit of mess when I removed it. I think the best way to handle it is still just removing the line and putting a bucket in preparation, since it will make refill and getting airs out easier (compared to complete drain). It's your choice!
EDIT (ALTERNATIVE TOP ROUTING): I am running 345 tires with very high camber, and it rubs my wheel liner a bit. Due to this, I later moved my hoses to go from the top, and below is the pic. You can either do it this way and skip the wheel liner routing (and I recommend using a DEI heat wrap as well for this one), or follow the remaining steps.
This is the alternative routing that goes in from the top. I've used 2xDEI heat wraps for additional insulation:
The OEM setup uses the top opening for routing the hoses towards the engine. This puts the hoses pretty close to the headers, and I don't think it's the best idea, at least without some insulation. In my case, I realized I can route the lines far far away from the header by making a small modification. That bracket I'm pointing at needs to go, so that you can bundle the lines with that big harness and safely tuck it under the wheel liner. It is held in place by one plastic retainer, and a few small zip ties. Second pic shows it removed.
Look at that; nice and bundled! You can then route the hoses towards the engine from (behind) where the brake hard line connection is.
At this point, temporarily install the wheel liner back to confirm that the lines are tucked behind it safely, and are not close to the tires, etc, or making any bumps on the liner. Don't skip this step.
V09 splices into the oil cooler's input line as show in the pic above. We need to remove the soft part of the line (1) in this pic. The direction of flow is from the top connection (coming from the engine) to the bottom (oil cooler).
Easier said than done. This was the hardest part of the project for me. The clamps were facing away on both ends, and they're different size! The bottom one is 7mm, and the top is 8mm. I was able to reach the top one using a swivel head 1/4" ratchet, but the bottom one was not easily accessible. I ended up forcing the clamp to turn a bit with a long screw driver, after which I had a small access to slowly loosen it with a long flat head. Good luck!!!
It looks like this when removed.
Create this by using hose elbows. After doing this, I had to cut down the length of the one for the hard line hose coming from the top, since it would not clear the engine mount. The bottom one has space, so a bit longer hose is OK. Keep in mind, these will need to move a little as the engine rocks back and forth.
Sorry for the dark pic. Here they are installed. To make it much easier on you, lace the inside of the hoses with coolant before trying to put them on. If the hoses are dry, they will get progressively harder to push forward, and you might get stuck (I did on one of them).
Now comes the routing part. As you can see from the pic above, the top radiator port rear of the car needs to plug into the oil cooler core side (bottom connection), and the port to the front of the car needs to plug into the hose coming from the engine (top).
Here's a pic with the bottom (oil cooler) side connected to the hose already, and the one coming from the top pending.
6. Leak checks, reassembly.
- First refill coolant. Don't worry about overfilling, since the engine can easily dump it if it's really too much. Keep refilling until it can no longer take any more, and there are no more bubbles.
- Cranking the engine: With your left food on brake, and right foot 100% throttle (not any less!!!!), hit the start button. It will just crank the engine, but will not start it. This way, you can run the water pump a bit and let the coolant move around. I recommend cranking twice for 15 seconds, 1 minute apart to let the starter cool down.
- Check for leaks: If you see any, fix it.
- Top up, and start the engine: With the coolant fill plug open, let the engine idle, and check for leaks. Top up the coolant if it gets lower. Now put the plug back in so we can let the engine safely come to high temps (150+ degrees F); blip the throttle to 2K, and then 3K for a short while, a few times. Shut the engine down, and if it's below 200 degrees F, slowly, and carefully open up the full plug to check on the level. Top it up (overfill), and you're done!
Reassembly time! Start with the liner.
Don't tighten the bottom bolts before every bolt is in its hole. Otherwise, it's easy to misalign.
Tired of 14EP? You can switch to any flanged M8x25-1.5 bolt like I did.
7. DONE! Time to test drive.
Now it's time for a test drive. You should check the coolant level often for the next few drives as the car bumps its air pockets out.
8. Optional: Inline thermostat.
See post 20!
I hope this helps : )
Last edited by X25; 11-01-2023 at 02:28 AM.

The following 15 users liked this post by X25:
123sugey (08-26-2023),
glamcem (09-05-2023),
IM4A2Z (08-28-2023),
Jacques Albrecht (09-03-2023),
John @ Dewitts (04-15-2024),
and 10 others liked this post.


The following users liked this post:
Fishfryer527 (08-27-2023)
08-26-2023, 09:53 AM
#4
Pro

Excellent write-up, as always! Appreciate the effort that goes into documenting this stuff - has to triple the install time. Results will be interesting for sure.
They don't "overheat" but in 80-90� or more OAT they can run hotter than optimal on track; coolant temps in the mid 230� range. It's still a ways off from overheating or hitting limp mode, but still meaningfully down on power.
They don't "overheat" but in 80-90� or more OAT they can run hotter than optimal on track; coolant temps in the mid 230� range. It's still a ways off from overheating or hitting limp mode, but still meaningfully down on power.
Last edited by AHP; 08-26-2023 at 10:32 PM. Reason: splelling
The following 3 users liked this post by AHP:
08-26-2023, 10:16 AM
#5


 08-26-2023, 11:02 AM
#6
I well imagine that they start to pull timing on the track in high ambient temps. I can definitely feel my car losing power when it's sitting in stop n go traffic when the sun is beating down and the temp is 95+. Getting your car out on a track is a whole different story in terms of the demands placed on the cooling system. The by product of the combustion of hydrocarbons is heat and lots of it. When you're just driving around, you might be tapping into 20% of the car's ability to produce power (heat). On the track, a good driver is more in the 90+% range.
08-26-2023, 11:14 AM
#7
Sr.Random input generator
Thread Starter
Excellent write-up, as always! Appreciate the effort that goes into documenting this stuff - has to triple the install time. Results will be interesting for sure.
They don't "overheat" but in 80-90� or more OAT they run can hotter than optimal on track; coolant temps in the mid 230� range. It's still a ways off from overheating or hitting limp mode, but still meaningfully down on power.
They don't "overheat" but in 80-90� or more OAT they run can hotter than optimal on track; coolant temps in the mid 230� range. It's still a ways off from overheating or hitting limp mode, but still meaningfully down on power.
Indeed, the car loses competitiveness when you go above 220 degrees F coolant, and this is a regression. C7 GS or 2017+ Z51 with its aux radiator has never had these issues at relatively most ambient temps.
Check out how fast it climbs the temps:
The following users liked this post:
PRE-Z06 (09-12-2023)
08-26-2023, 09:06 PM
#10
Sr.Random input generator
Thread Starter
I did a bit of a test drive around the town today, and coolant was around 175 degrees F with oil around 150 degrees F while cruising on the highway. If I recall, it was about the same before installing radiator with the AC running in mild (80 degrees F) ambient temps.
Does anyone know how the thermostats work on C8? Is there any good schematic? I'd love to see if I should add a thermostat to this, or if the system is already regulating it. There are beautiful flow control thermostats (that just bypass most of the the flow below desired temps), but they are mostly for oil type fluids. I found a smallish thermostat for coolant with bypass from a BMW of 1980s, but not sure if it's the best choice. And again, perhaps the existing thermostats are regulating the flow to this one already; just don't know about the layout on this car.
08-27-2023, 08:40 AM
#11
I'll be at ORP (the same track I shared video from) on next Friday. I can't wait to check on how the temps will fare this time!
I did a bit of a test drive around the town today, and coolant was around 175 degrees F with oil around 150 degrees F while cruising on the highway. If I recall, it was about the same before installing radiator with the AC running in mild (80 degrees F) ambient temps.
Does anyone know how the thermostats work on C8? Is there any good schematic? I'd love to see if I should add a thermostat to this, or if the system is already regulating it. There are beautiful flow control thermostats (that just bypass most of the the flow below desired temps), but they are mostly for oil type fluids. I found a smallish thermostat for coolant with bypass from a BMW of 1980s, but not sure if it's the best choice. And again, perhaps the existing thermostats are regulating the flow to this one already; just don't know about the layout on this car.

The following users liked this post:
pistolpete817 (08-27-2023)
08-27-2023, 10:24 AM
#12
I say don't worry about a thermostat for it. The Z06 has monster cooling capacity and GM seemed fine with that. In mild ambient temps, the Z06 oil temp sits at like 160 degrees when driven like a normal car. Super low.
08-27-2023, 12:53 PM
#13
Sr.Random input generator
Thread Starter
My copy of service manual is not great, and it might not be complete. When I searched, I only found one set of instructions to replace thermostat, and it's the one thermostat at the main coolant manifold. The hoses I ordered for V09 were also missing a thermostat among few other things, which is why I decided not to use them.
In any case, the system is still mostly thermostat controlled. Even if we don't add a thermostat for the 4th (this) radiator, the system will still reduce the flow to the 3 other radiators and keep temps in check to some extent.
The hoses by the radiator core inside the wheel liner are very easy to access. In future (winter?), if I find a suitable thermostat with bypass, I can easily add it in there in a few minutes, and let it bypass the radiator core seamlessly. As I mentioned, I ordered one such unit already, and should receive it next week. If/once I do, I'll add it here as well : )
08-27-2023, 01:10 PM
#14
My copy of service manual is not great, and it might not be complete. When I searched, I only found one set of instructions to replace thermostat, and it's the one thermostat at the main coolant manifold. The hoses I ordered for V09 were also missing a thermostat among few other things, which is why I decided not to use them.
In any case, the system is still mostly thermostat controlled. Even if we don't add a thermostat for the 4th (this) radiator, the system will still reduce the flow to the 3 other radiators and keep temps in check to some extent.
The hoses by the radiator core inside the wheel liner are very easy to access. In future (winter?), if I find a suitable thermostat with bypass, I can easily add it in there in a few minutes, and let it bypass the radiator core seamlessly. As I mentioned, I ordered one such unit already, and should receive it next week. If/once I do, I'll add it here as well : )
In any case, the system is still mostly thermostat controlled. Even if we don't add a thermostat for the 4th (this) radiator, the system will still reduce the flow to the 3 other radiators and keep temps in check to some extent.
The hoses by the radiator core inside the wheel liner are very easy to access. In future (winter?), if I find a suitable thermostat with bypass, I can easily add it in there in a few minutes, and let it bypass the radiator core seamlessly. As I mentioned, I ordered one such unit already, and should receive it next week. If/once I do, I'll add it here as well : )


The following users liked this post:
pistolpete817 (08-27-2023)
08-27-2023, 01:16 PM
#15
Sr.Random input generator
Thread Starter
Do you have the part number for the thermostat unit? I see this:
https://www.tascaparts.com/oem-parts...ostat-84660340
I can order it to see how it looks like but it doesn't seem to have a bypass : )
https://www.tascaparts.com/oem-parts...ostat-84660340
I can order it to see how it looks like but it doesn't seem to have a bypass : )
08-27-2023, 01:39 PM
#16
Do you have the part number for the thermostat unit? I see this:
https://www.tascaparts.com/oem-parts...ostat-84660340
I can order it to see how it looks like but it doesn't seem to have a bypass : )
https://www.tascaparts.com/oem-parts...ostat-84660340
I can order it to see how it looks like but it doesn't seem to have a bypass : )
https://www.gmpartsnow.com/v-2023-ch...ans-oil-cooler

The following users liked this post:
pistolpete817 (08-27-2023)
08-27-2023, 06:20 PM
#17
Racer

Fantastic write up my man! Excellent documentation! Can�t wait for track temp results.
The following users liked this post:
X25 (08-27-2023)
08-27-2023, 07:08 PM
#18
Racer


Great write up and picture gallery. I am anxious to see how well it works.
I wonder if it is possible to order the extra radiator for a US delivery?
I wonder if it is possible to order the extra radiator for a US delivery?
08-27-2023, 07:13 PM
#19
Sr.Random input generator
Thread Starter
I don't think you can order it in U.S.. In those hot countries, it seems to be part of the Z51 package..
09-03-2023, 02:41 AM
#20
Sr.Random input generator
Thread Starter
Addendum: Adding an inline flow control thermostat
I've been communicating with Derale, and they have stated that their flow control thermostat (25719) should work just fine with coolant. I asked twice, they said yes : )
What's needed:

First install adaptors on the thermostat.
The teflon tape should be ONE LAYER, and not any overlapping layers, or else you might have leaks.
Tighten them a lot more than you think is enough. Don't worry, it is sturdy. I had to remove and re-tighten due to leaks... : )

This is how it looks with ports installed. The main body is about 10cm, and we'll need to trim the hoses as such. Leave slack with hoses, since you'll need some slack to make sure hoses don't kink with the thermostat forcing hoses together.

I marked where to cut, and then used my awesome garden scissor tool to have a clean cut. If the cut is not clean and nice circle, clean it up with a blade, since it might cause issues/leaks.


I've used line blockers to avoid losing too much coolant... and voila, it's installed!! Remember, the beefy side of the thermostat is where the internal thermostat is, and should be hooked up to where the fluid is coming from (the front top hose of the radiator).
Start the car, and check for leaks. Also, wait until coolant comes to 180+ degrees to check leaks again and verify its operation. The bottom two hoses should stay very hot, and top two hoses should stay luke warm (with the hose going to front of radiator being a little warmer). This happens because 90% of fluid will be bypassed, and 10% will go to radiator. Once it hits 180 degrees F, the top hoses should also feel very hot. Once you confirm all this happening, you're good!
I've been communicating with Derale, and they have stated that their flow control thermostat (25719) should work just fine with coolant. I asked twice, they said yes : )
What's needed:
- Derale 25719 Flow control thermostat (or whatever you'd like to use).
- 4 x 1/2" NPT to 5/8" barb adaptors.
- Teflon tape
- 4 x clamps
- Hose clamp pliers if you'll add this AFTER aux radiator install.
First install adaptors on the thermostat.
The teflon tape should be ONE LAYER, and not any overlapping layers, or else you might have leaks.
Tighten them a lot more than you think is enough. Don't worry, it is sturdy. I had to remove and re-tighten due to leaks... : )
This is how it looks with ports installed. The main body is about 10cm, and we'll need to trim the hoses as such. Leave slack with hoses, since you'll need some slack to make sure hoses don't kink with the thermostat forcing hoses together.
I marked where to cut, and then used my awesome garden scissor tool to have a clean cut. If the cut is not clean and nice circle, clean it up with a blade, since it might cause issues/leaks.
I've used line blockers to avoid losing too much coolant... and voila, it's installed!! Remember, the beefy side of the thermostat is where the internal thermostat is, and should be hooked up to where the fluid is coming from (the front top hose of the radiator).
Start the car, and check for leaks. Also, wait until coolant comes to 180+ degrees to check leaks again and verify its operation. The bottom two hoses should stay very hot, and top two hoses should stay luke warm (with the hose going to front of radiator being a little warmer). This happens because 90% of fluid will be bypassed, and 10% will go to radiator. Once it hits 180 degrees F, the top hoses should also feel very hot. Once you confirm all this happening, you're good!